Camel Drawing Tutorial
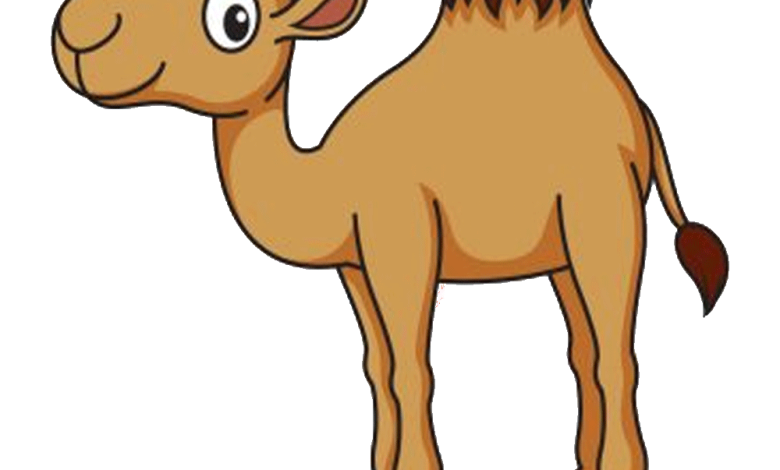
Camel Drawing Ideas
The camel is an even-toed animal that is by and large generally seen wandering around deserts. Contrary to common reasoning, a camel’s bulge stands no sort of test yet it truly stores fat. This is the avocation for why camels can manage without eating for broad timespans. Learn fluttershy drawing on our blog.
We rarely see a camel, taking everything into account, considering the way that they live in hot and dry spots, as such we decided to make a drawing educational activity for it so we can all see the worth in its heavenliness exceptionally close. We have made a one small step at a time on the most capable technique to draw a camel, summed up in 9 quick and basic errands. Furthermore, every direction goes with a depiction to go about as your visual helper as you follow the means exclusively.
Stage 1 – camel drawing
Start by drawing an irregular sideways oval shape on the upper left 50% of the paper. The oval should have a more prominent right side diverged from its left side. This designs the outline of the camel’s head. Make sure to characterize a twisted limit covering on the gave base piece of the structure to shape the mouth of the camel.
To ensure that the camel will be drawn in the center, you can make reference lines by drawing a gathering level and vertical line across your paper. These principles should isolate your paper into four rectangular spaces. The space on the upper left corner of the paper indicates where you should draw the structure of the camel’s head.
Stage 2 – Design the Camel’s Head and Center
Draw a delayed, tight twisted shape under the head to approach the long neck of the camel. Then, draw the condition of the body with a colossal thump at the top — one of the camel’s most unquestionable genuine features!
Remember, use light strokes while drawing the system of the camel’s head and center. Do whatever it takes not to push down unnecessarily hard with your pencil so you can without a doubt kill a couple of bits of the format you might in all likelihood at absolutely no point in the future require later on.
Stage 3 – Add the Projection on the Body of the Camel
Add a ton of roughage or grass on the thump on the camel’s body. This simplifies it for people to ride on the back of a camel without hurting themselves. The roughage laying on of the camel’s hill can be outlined simply by drawing different pointed shapes. The sharp shapes should be packed together close to one another outlining a sideways oval shape.
Stage 4 – Next, Draw the Right Legs of the Camel
Draw two legs with hooves on the right 50% of the camel’s body. This designs both the right front leg and the right back leg of the camel. Attempt to add a thump in each leg. This mirrors the camel’s hard leg structure, appropriately making your drawing look sensible! Directly following drawing the camel’s right legs, make sure to destroy any lines from the design covering inside the legs. This helps keep your drawing more refined, or more all, smooth and clean!
Stage 5 – Complete the Camel’s Every one of the Four Legs
Go over the past step in actuality side of the camel’s body. This makes the left front and back legs of the camel, subsequently completing its four legs! Since the camel is looking towards the left side, its left legs are simply mostly evident, as shown in the diagram above.
Stage 6 – Then, Draw the Arrangements of Ears of the Camel
Draw an oval figure with hardly pointed closes on each side of the camel’s head. This makes the camel’s arrangements of ears. Camels usually have short, upstanding ears, so recollect that while drawing the ears. Guarantee you erase a couple of bits of the head’s graph covering inside the ears too!
Stage 7 – some time later, Add the Tail of the Camel
Draw an extended, tight line figure with a rugged tuft close to the end clearly connected with the base back of the camel. This designs the camel’s tail. The tail can be formed simply by characterizing two equivalent limits while the shaggy tuft is basically essentially as straightforward as drawing an upside down drop figure. Make sure to add slight line strokes on the sharp completion of the shaggy tuft to add surface!
Stage 8 – Add Nuances on the Substance of the Camel
Draw a gigantic standing oval shape on the camel’s face near its ear. This designs the diagram of the camel’s eye. Consequently, draw an upward twist shape with a short fairly twisted vertical line at the base. This makes the nose of the camel directly over its mouth.
Stage 9 – As of now, Draw the Camel’s Facial Features
Complete the look by drawing the camel’s eye and inside ear! Go on by drawing a little oval shape inside the system of the eyes that we pulled in the past step. Then, draw a more humble circle inside the oval shape. Disguise the entire oval while leaving out the little circle unshaded. This makes a close to home “sparkling eyes” influence.
For inside ear, basically draw a figure inside the ear following its structure. Moreover, that is all there is to it! Now that we’ve successfully drawn a camel, it’s the best an open door for the most fascinating part. Finally, we’ll assortment the camel!
Camels essentially have light hearty shaded covers with a sprinkle of grayish tone. You can pick to assortment the camel using its special tone or use a substitute tone! We recommend doing the last choice so you can change your masterpiece.
Also Read stop india